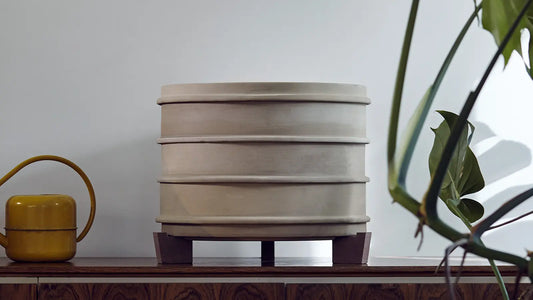
In this post we will show you what the first 42 weeks with your new WormUp HOME can look like. For everyone who wants to get a feel for the composting process in WormUp HOME and its speed and is looking for important background information. Pictures before and after the weekly feeding give an impression of how quickly different feed is broken down. The quantities are guide values. Each composter behaves differently depending on location, humidity, temperature and worm food.
Day 1 (Week 1) I use the composter according to our instructions. The worms are in the composter, the first 300gr. Lining added, I'll wait with the bars. I chose a shady place in the office for the location. So here we go.
Day 4 (Week 1) I put my finger in it and think it needs some water. I squirt about 2dl of water. - When I lift the lid, everything moves briefly under the surface, it looks good.
Day 7 (Week 1) After a week, the easily degradable waste is converted, what remains is cardboard and, for example, some parsley stalks. The surface has become nice and smooth from the worms. The second feeding is coming up.
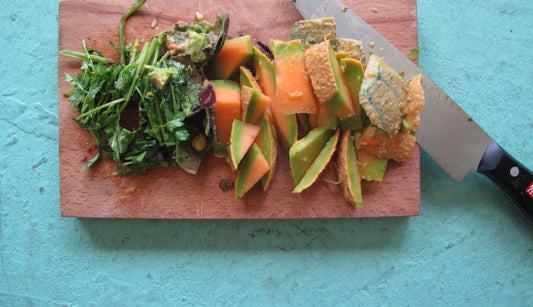
We take 350g of organic waste: coffee grounds, stale parsley, watermelon rinds, etc., and three soaked TPK rolls.
Of course everything is cut up. The whole thing gets an approx. 2dl water shower with the spray surface. The lid goes back on.
Day 12 (Week 2) From the 7.54 kg of day 7 there are still 7.1 kg 5 days later. The weight loss is a whopping 440g. Most of this is water that has evaporated. I take the spray bottle and spray 2dl. New weight level 7.3kg.
Day 14 (Week 2) In the last two days, the composter has lost 140g in weight. Now re-feeding 390g of waste and 190g of soaked egg carton. New weight 7.74 kg.
Day 21 (Week 3) 460 g decrease in the last 7 days, the composter evaporates around 70 g water per day, that is about ½ liter per week. I'm currently on vacation, Nikolai feeds 300g, the new level is 7.58kg.
Day 31 (Week 5) In the last 10 days I've added 3dl of water once. Not much happened because of the holidays. What can be seen now, especially on closer inspection; the easily degradable materials are already gone. Material that is more difficult to process, such as cardboard, avocado skins or leaf veins (here the tomato stalks) are still there.
Background: Insert first grid: By now the top of the fresh compost is about 2cm above the bed, so it's time to put in the first grid. To do this, the two upper, still empty rings are removed and the grid is simply placed on the waste.
Now new food is put on the grid, this time 450g organic waste, 3dl water and 90g damp cardboard, et voilà, it also looks beautiful.
Day 38 (Week 6) I checked briefly before the hot weekend. It was a bit too dry. That's why I sprayed 2dl of water. At this time of year, with the great heat, it can also quickly become too humid. This is because the waste breaks down rapidly and thus all the water from the cells (from the organic waste) is released in no time. Caution is therefore required at air temperatures above 30°C. I then fill the lid with water to cool it down.
Anyway, I didn't put very much rubbish in the new grille a week ago; 450g. When I now open the lid, some worms are already above this grid, that's how it should be. The seedlings are from the melons, they don't bother and will soon be composted as well.
The little brown things are mites. These are part of the process. In the first few months (up to around month 6 after the start), they sometimes occur in large numbers. It is a bit strange that the small animals like to "hang around" on the outside or the lid of the composter. We don't know exactly why that is, interesting to watch anyway. They will disappear again over time.
Because the worms are already so voracious, I'll throw in 500g this week. From the greengrocer I get old parsley, plenty of coffee grounds as always, as well as leftover beans, parts of a cucumber frozen in the fridge, corn cobs, etc. As already described above, more caution is required at high temperatures. For me that means; the composting process should not go too fast. "Roughage" is needed. Cardboard works well. Therefore 250g damp cardboard is added. Mix and then spray the whole thing with 1.5 dl of water.
The bottom ring is now almost full to the top. Now I'm looking forward to next week, whether they'll really knock it all off. I fill the lid again with water because of the heat.
Day 45 (Week 7) I haven't done anything for a week now. The water evaporation has now also decreased by almost half to 0.3 dl / day. On the other hand, I am still fascinated by the rapid degradation of the easily degradable matter, as can be seen in this lemon leaf; after 7 days only the skeleton remains:
I stick to a diet of 500g organic waste and 200g soaked egg carton, fill the lid with water, the next heat wave is coming.
Day 52 (Week 8) Not much new for this week. The dismantling worked well, almost only the box remains and there is space for new food. That's why I add 50g of dry cardboard, but still add 1.5 dl of water. Moisture helps, especially in warm temperatures.
I increase a bit to 590g mixed food. It seems a little wet to me.
Day 59 (Week 9) Of course, as always, I cut everything up last week. Still somehow fascinating to see that only a small piece of skin remains from the old tomato, I can't see anything from the banana at all. The sunflower will take a little longer.
Background mold:
Very modest, but in certain places I see some white mold. The mold does not bother the worms, even if there should be a little more now. Neither do I, of course, but everyone has to decide that for themselves. The mold will quickly disappear. If the whole thing is mixed up or covered up a bit, the process goes even faster.
Feed this week: 650g, slightly less carton 30g (dry) and 1.5 dl water sprayed.
Background cardboard: The close-up shows how the box is successively reduced and dismantled. The question often arises as to why the regular addition of cardboard is necessary. Cardboard was originally wood, i.e. lignin and cellulose. These two "compounds" are very difficult for microorganisms to break down (this is a trick the trees use to prevent their wood from being eaten away immediately). Nevertheless, the microorganisms are busy breaking down these compounds. But this costs energy. Long story short: Cardboard acts like dietary fiber in humans. Since the dismantling is more strenuous or precisely because of it, the entire process stabilizes better. A balance is created (in technical jargon this is called the C/N ratio). In addition, cardboard offers structural advantages in terms of water balance.
Day 66 (Week 10) Not much to report this week; 700 g of waste (cucumber and watermelon peels, coffee grounds, carrot slices and other things), together with 30 g of dry cardboard (corresponds to the lower part of a 10-egg pack), the whole thing finally sprayed with 0.5 dl of water.... happy holidays!
Day 80 (Week 12)
The worms waited impatiently on the surface for their new food after 2 weeks of vacation. Only waste that is difficult to decompose (apricot stones, corn cobs, cardboard, woody vegetable remains) can still be seen.
Because the worms have been fasting, there is now a large portion: 800 g organic waste and 30 g dry cardboard. Then I spray another 0.5 dl of water.
Background: eggshells: For dessert there are still the eggshells that we collected in the office. When dried, they can be finely crumbled. In the composter, the lime from the eggshells is slowly chemically dissolved, balancing the acidity of the organic waste. The coarser the pieces of lime, the smaller the surface area with which the acid can react. So, as always, chopping speeds up the process.
Day 87 (Week 13) I am amazed that the worms almost completely cleaned up the 800g. I even see worm droppings on the 2nd element, which tells me the worms were up there. Were they perhaps even hungry again? The egg shells from last week have not yet been broken down but have been mixed in by the activity of the worms and are therefore less visible.
As a result, there is now exactly the same amount as last week: 800 g organic waste, 30 g dry cardboard, 50 g water from the spray bottle.
Day 94 (Week 14) The last wastes were very watery and thus the decomposed material became quite wet and dense. It doesn't seem to bother the worms, but I did dig through the top layers mid-week. Loosening brings air in, we want to eventually encourage those microorganisms that need oxygen (just like the worms do).
Feeding (same as last week): 800 g organic waste, 30 g dry cardboard, 50 g water from the spray bottle.
Day 101 (Week 15) Only the outermost skin remains of the melons, while the carrots are still there after a week. Feeding: 600 g organic waste, 200 g coffee grounds, 50 g dry cardboard, no additional water because the compost mass is still quite wet.
The waste from our office is no longer enough to feed all of our running composters. Therefore, we now collect coffee grounds and waste around us.
Day 108 (Week 16) The worms should be able to convert today's portion very quickly, the material is chopped up very small and consists mainly of fibers, a feast! Feeding: 800 g organic waste (including 200 g coffee grounds), 30 g dry cardboard, 40 g water from the spray bottle.
Background: Overview of feed weeks 13, 16, 17 and 18: The diet of the worms should be varied. At home it happens automatically, here in the office I have to choose the waste a bit. Coffee grounds are always included from this week.
Background coffee grounds: From now on I always feed ¼ of the weight (200 g) of coffee grounds. 1. The worms love coffee grounds and 2. Does the coffee grounds already have a good structure and is rather dry, which means that more of it will be left over and more humus will be built up. However, coffee grounds should not be fed in enormous amounts. It has a rather acidic pH. The diet of the worms should always be balanced.
Day 115 (Week 17) The humidity in the composter has stabilized again. The juice residue is gone, only a few zucchini ends are still untouched. The worms get a large portion of celery and sweet potato skins. I'm not sure if these litters aren't a little hard to bite. Since the bowls contain rather little water, I soak the cardboard again this time.
Feeding: 600 g organic waste, 200 g coffee grounds, 70 g damp cardboard and 40 g water from the spray bottle.
Day 122 (Week 18) The celery germinates first, no sign of degradation. The sweet potatoes are partially degraded.
The waste last week was rather dry, the worms may not have felt so comfortable in the food layer. Instead, there is beautiful worm castings underneath. I'm feeding less for once so the worms have time to digest last week's celery.
Feeding: 300 g organic waste, 100 g coffee grounds, 40 egg shells, 40 g damp cardboard and 30 g water from the spray bottle. The waste reaches out over the edge of the first working element for the first time.
This week, in addition to the water-based cucumber peels, there will be a bouquet of flowers for the first time. The flower stalks act similar to cardboard scraps because they are lignified and have a lower water content. The bouquet of flowers slowly decomposes and contributes to the build-up of humus.
Day 129 (Week 19) The leaves of the bouquet are just lattice. Cucumbers and tomatoes are completely gone, as is the celery after 2 weeks. This week's food has already dried up a bit. The bouquet of roses in particular. Therefore, 800 grams is quite a lot of "substance" and little water. I therefore add more water (1 dl) & soak only a little cardboard (50 g, moist). Because the stems take over the function of the cardboard.
Background humus production:
As with our live composter, it can also happen in other households that the composter simply does not "grow". There are 2 simple tricks to boost humus production:
You can also feed before the food from the last feeding is completely gone!
If you look at the pictures in the blog (e.g. week 17 or 18), you will see that after a week, for example, the stalks or fibrous skins of celery, pumpkin and co. are still woody. are still clearly recognizable. Still, I kept feeding. It is only important that the layer of “recognizable” waste does not become thicker than 3-4 cm. If you feed every day, then of course the waste from the last few days is still clearly visible!
Feed more woody material, coffee grounds, cardboard, paper, stalks if you feel your composter is "not growing"
Little humus is then produced if mainly water-containing waste is fed. It seems at first glance that the worms only “like” lettuce, melons, leaves, etc. However, the rapid disappearance of this waste has to do with the fact that it mainly consists of water. Above all, the worms (and microorganisms) like variety.
A little digression for those who want to know more:
From the point of view of the community in the composter, feed consists of water, nutrients (especially nitrogen) and carbon. Different types of waste have different compositions.
The carbon is a source of energy for the microorganisms (as well as for us humans!) and can either be broken down well (e.g. sugar in fruit; starch in cereals) or badly (cellulose, lignin in woody parts, e.g. cardboard, stems of flower bouquets, coffee grounds, avocado skins). In addition, nitrogen (keyword C/N ratio) and water are required for degradation.
Humus is formed in particular from woody waste if the carbon cannot be completely broken down. If the carbon were completely broken down, i.e. used up, it would escape as CO2 (carbon dioxide) and no humus would remain.
It therefore needs a good balance of different food sources, because we want to make our waste "disappear", but not completely, because we want to harvest worm castings!
Day 136 (Week 20)
I feel like moving forward, but unfortunately it's still too early for the second grid!
This time there is light fare: cucumbers, tomatoes and pepperoni. Lining: 30 g dry cardboard and 800 g, of which 200 g coffee grounds. I end up spraying about 1 dl of water over the whole thing, although it's rather damp.
Background: root ball cure:
As a special treat today there is a dried root ball of a sage. At the end I crumble it dry on the surface because it is quite damp in the composter. The worms love to crawl around in old root balls! The dead roots are very fine and can therefore be broken down easily. The earth is tired and needs a boost. If it is also composted, it is optimally recharged with nutrients and living beings.
Day 150 (Day 21) The worms have really taken root in the root ball and turned the remaining scraps into crumbly humus, except for a few celery leaves and avocado peels, which I can see on the surface. I therefore assume that the worms are hungry again and this time there is therefore 1 kg of waste (including 200 g of coffee grounds). Because pumpkin skins feel rather woody, this time I add a little damp cardboard (85 g) and 30 g water.
After two days I can feel the pumpkins giving off a bit of warmth, the temperature has risen from the usual 20°C to around 25°C. Everything in the green area.
Day 157 (Day 22) The pumpkin pieces aren't quite gone yet, so I rummage through the scraps a bit before I feed them.
Feeding: The worms get 1kg waste & 300 g coffee grounds. I mean well (a little too well) because I'm on vacation next week. Add 70 g dry cardboard and 20 g water.
The day after feeding, I feel the waste in the top layer getting warm again. I rummage in the composter. Then I make a hole in the middle, giving a bit of space for the compost to cool. I keep watching for the next few days, after 3 days the temperature has returned to normal, it smells a bit more like compost than usual, but the worms don't seem to mind!
Background: Experimenting with the WormUp HOME
In order to get to know your own ecosystem, it is important that you experiment yourself. Over time you will develop a sense of when the system and the worms are doing well and where the limits are and you should take action. You can experiment not only with the amount of waste and water, but also with the type of waste (especially with the «expert food»).
When trying it out, it is important that you observe carefully: Unpleasant smell, heat development and escaping worms indicate that you have overdone your willingness to experiment or have reached the limits of the system. Then it is best to remove some of the waste again (see below in the blog).
It is also important that you are at least in the second work element. This gives the worms enough space to retreat below if they feel uncomfortable in the top layer of compost. Then they can move away if, for example, a piece of waste is too acidic (a few citrus fruits), too dry (e.g. sawdust, dried-on waste) or too energetic (e.g. few lentils, pasta) and come back when it suits them again (temporarily a develop odor).
Day 171 (Week 24)
Background: seedlings
The many pumpkin seeds have all germinated now, 2 weeks after the last feeding. A real forest. Most of the seedlings will simply die off if you keep feeding them because the pure worm castings are too strong for them. However, pumpkins really like compost and grow into strong little plants quite quickly. The seedlings should therefore be bent or torn out. Then they compost just like other waste.
Background: insert grid 2
It's also finally time for the second grid! The second working element is already half full, but I now know from experience that it is better to insert the grid late than too early. I flatten the pumpkin seedlings under the grid a little so that the grid has good contact with the compost surface and the worms can easily come up. I also transfer a handful of worms from below onto the grid. When feeding, I first sprinkle the coffee grounds on the grid so that they fill in the remaining cavities.
Feeding: 1 kg waste (including 250 g coffee grounds), 80 g damp cardboard, 20 g water from the spray bottle.
Day 178 (Week 25) Background: Problems after the lattice onset
A typical problem has arisen: under the lattice there is indeed swarming in the nicely crumbly worm castings. But the garbage on the grid is quite slimy and there are few worms in it. Apparently not all worms have realized that there is something to be found up there.
Conclusion: after inserting the trellis, feed more carefully, ie less, cut into small pieces and selected. Help out the worms by taking a handful of worms to the top.
As it turns out, I didn't take my own advice very seriously (just look at the pictures, it's obviously a lot of fodder!!)
Feeding: 1 kg, of which 200 g coffee grounds, 80 g wet cardboard, 20 g water.
Background: Alert: Worm Escape in full swing
The next day I find about 15 dried worms on the floor. This is a warning sign (except when restarting, which can happen)! I find the reason for this when I look in the composter: it's not hot, but it smells rotten and the waste is slimy. I have to assume that the worms in there didn't like it anymore and that's why they fled. Unfortunately, they can no longer find their way back into the composter and dry up. (If worms escape when you're in full operation and you don't know what to do, give us a call!)
Measures: I take out about half of the waste (420 g) and mix dry cardboard into the mass again. I must have overestimated the capacity of our composter. Although the worms could now handle 1 kg for three weeks, this time it was too much. This shows how the system does not always work in the same way.
Day 185 (Week 26) Now everything is back to normal, but to be on the safe side I feed a little less this time. Cucumbers, which are easy to digest (since they consist almost entirely of water) and pumpkin, which gives the worms something to bite and lasts longer.
Feeding: 900g waste, of which 200g coffee grounds, 40g dry cardboard, 40g water.
Day 192 (Week 28) Feeding: 750 g organic waste and 200 g coffee grounds, 40 g dry cardboard, 50 g water.
I'll also take a look at what the lower elements look like. The worm castings on the lowest level look beautiful, although they are a bit damp... There is nothing left of the cardboard, a few seedlings and many more worms suggest that the compost is not yet very mature.
Background: worm mating
For the first time I see two worms mating. I'm scared at first, it looks like they accidentally crawled into a rubber ring or something, tied up like that. But then I watch in fascination as they each strip off a cocoon.
Day 199 (Week 29)
Only the lignified thyme stalks are left from last week. Feeding: 600 g organic waste, 200 g coffee grounds, 30 g dry cardboard, 40 g water and 40 g eggshells.
Background: mixing in after feeding
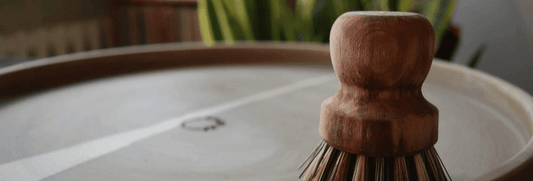
The layer of waste seems a bit thick to me, so I mix it with the finished worm castings. This helps degradation because worms and microorganisms are already distributed over the entire waste surface and do not have to colonize them first. Pressing it on a little afterwards also helps and spraying it briefly with the spray bottle.
Day 208 (Week 30) Here you can see once again how the fleshy mangoes and cucumbers have already been mined. The sugar from the mangoes is now converted into biomass, the water evaporates or is also absorbed by the living beings. The dry, woody avocado skins are still there, they are harder to bite into and will probably take a few months.
Again I dare to take a look at the bottom floor: there are still many worms, which means I can't harvest yet.
Today we have green food - so nice!
500 g organic waste, 100 g coffee grounds, 20 g dry cardboard and 40 g water. The entire composter currently weighs 19 kg! It's a good thing that I can move the elements individually for weighing.
Day 215 (Week 31) A comparison with last week shows that not everything is broken down at the same time: Cucumber and chives have been converted. Celery and leeks are not degraded yet. The so-called shredders (e.g. mites, springtails) set about shredding the waste from the edges and making it more vulnerable so that the microorganisms can then do their job.
It smells a bit like leeks, as always with bulbous plants. So that it smells less, I dig under the unmined waste a little.
Feeding: 800 g organic waste, 200 g coffee grounds, 50 g dry cardboard, 30 g water
Day 235 (Week 34) The worms survived the extended Christmas holidays without any problems. The material has already been mined quite well. I do the check right away and see that there is already nice worm castings in the lowest element and the worms are busy crawling up and down. There have been fewer worms in the lowest element and I find mating worms again.
Day 242 (Week 35) The roses from last time are mouldy, a sign that they are more likely to be decomposed by fungi and that the worms have not yet developed a significant microfilm of bacteria and substances. That also makes sense, because the roses are rather woody and have relatively few nutrients in the petals. So I mix in the mold before I feed.
Although there is still some left over from the last feeding, there is now a larger portion (800 g + 200 g coffee grounds) and also roses again. Since they are slowly degraded anyway, that should be ok. I also add residue from the juice press, which is also almost pure cellulose, but made nice and small.
Day 249 (Week 36) This week I'm feeding citrus for the first time. In small quantities this is not a problem at all. Especially now that the composter is full. And of course just chopped!
The composter starts to smell a little after feeding. It doesn't bother me, and neither do the worms. As long as the lid is closed, you don't smell anything. If it bothers you, it's worth feeding less at a time and mixing in the waste well. Many things that we have classified as expert food are there because they start to smell (potato peels, onions, garlic, cabbage...).
Day 263 (Week 38) Even after two weeks, the sweet potato skins have not yet broken down. The somewhat slow decomposition could be due to the fact that the room temperature is just 16°C.
This time there are also hair and dry bay leaves. To explore a little bit what happens to the different wastes, I arrange them in 4ths. First the scraps of cardboard go in and then the waste. With this order I can see what happens to the waste.
Day 270 (Week 39) We don't cook that much at the moment: feed 160g this week, I don't add extra water or cardboard, it's moist enough. The hair is of course still there.
Day 285 (Week 41) It's finally here: Today I'm harvesting! After a whopping 40 weeks, i.e. 10 months. It took longer than expected (see reflections earlier in this blog). Now I have the feeling that there are not many worms left in it. That means the WormHumus is ripe!
I haven't used the 3rd grid yet, but I still have enough material now so that there is enough space for the worms after the harvest. So here are the happy pictures:
Background: Harvest worm humus
Nice, crumbly worm castings in the bottom element. I read out a few last worms, there are almost 100 left. I could also leave them in & add them directly to my plants...
Since the worm humus is quite moist, I can't sift it out.
An alternative to separate the worms from the worm humus: I put the element with the mature worm humus on top and harvest slowly, layer by layer. The remaining worms retreat from the light and slowly migrate down. At some point they fall through the grate onto the fresh waste in the middle element. It works even better with a bright lamp and a bit of patience, the worms don't migrate as quickly.
I remove the grid with a flourish & put the now empty element back on top :). I gained a good 5 liters of quite moist worm soil.
That's why the empty element is pretty much stuck with soil. I clean it with a brush and water. It amazes me that this moisture is still supposed to be from the scraps at the very beginning (remember, lots of lettuce and watermelon for a few months). At home, the harvest is much drier. This is very much related to the waste and the location.
This completes a cycle. Of course, the composter continues to be fed. Sometimes he gets more, sometimes less. Sometimes the worms are up, sometimes further down. Every once in a while I throw in something new just to see how long it takes to degrade. Finally a few more pictures.
Wintry ensemble with very little cheese rind. || Spring bouquet with lemon zest.
Rocket on pink paper. || Wheatgrass residue from planting for a fair.


 The narrowing ensures that the content does not loosen and fall out. Gently lift the active element and check if the content loosens. If it does, put the active element back – it's too dry. Add 0.5-1 liter of water evenly to the active element and plan to harvest the next day.